The Wood Fired Gas Producer
For information about this vehicle see http://www.angelfire.com/ak5/energy21/woodfire.htm
It's copied here, from a pamphlet by
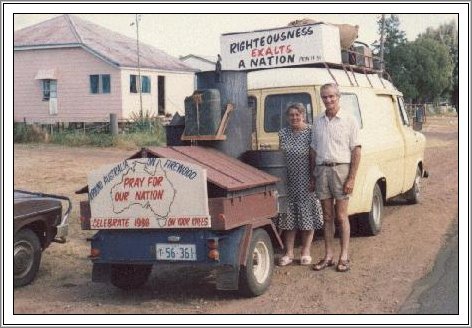
I have seen this vehicle running myself some years ago and was driven by Robert and Maraget Pope.
The vehicle shown above had a top speed of 80 kilometres and has travelled throughout Australia
This couple are Christian who believe our present system is in deep and trouble and may soon collapse.
They run a small farm and Christian helping center in Spalding South Australia.
They have dedicated their lives to helping others and are trying to developed a relaible form of transportation to help provide a reliable transport system for the interior of Australia and in paticular the Aboringal people when the present fuel power transportation system reaches a collasping point.
The idea is not a new one and was apparently used during world war II here in Australia. see photographs here
Part of a booklet published by Brenton & Margaret Pope
Brenton and Margaret Pope went around Australia in a car run by a Gas Producer
The gas producer should operate on any solid fuel. We have even tried using old tyre treads and dry sugar cane. We are told that cattle dung will work. We have used charcoal but not used coal. No doubt it would provide more KM's per tonne than wood.
Just as you would choose the best burning wood for your fireplace or slow combustion heater, you naturally choose the best available wood for the firebox. A fill of pine offcuts would only make 40% of the KM as a fill of yellow box or redgum. We reckoned on about 2,000 km per tonne of wood (2km/kg). This should be improved by the addition of steam to an expected 2,500-3,000 km per tonne. The amount of water used is about the same as the gallonage of petrol that would be consumed.
WASTE WOOD PLENTIFUL OUTBACK
Dry firewood was our fuel. We rarely cut down any dry standing wood except a few 'snappy gum' sticks north of Alice Springs, We mostly just beat the white ants to use dry sticks on the roadside. We drove a small tungsten blade sawbench off the engine and mounted on the edge of the front bumper bar. Within three minutes of stopping we could be sawing wood. We tried various lengths but found about 8" long was best. We stored the wood in the trailer behind the firebox with a well insulated gap to prevent the load catching fire. It can easily occur in 40 degrees C heat.
GOOD EUCALYPT FAVOURED.
We favoured using eucalypt firewood because of its low tar content but often had no alternative but to use acacia (mulga, wattles and gidgee). It is essential to have a firebox temperature exceeding 1000 degree C to ensure the complete combustion of the tar and resin vapours. Gidgee is so full of tar. It is very ant resistant; fence posts have exceeded 100 years life. It gave us the longest run of all on a fill - 220 km between Camooweal and Tennant Creek.
Although we are told that five different chemical reactions take place in the gas producer the most common one is the simple reduction of steam by hot carbon. C + H2O -> Co + H2. The hydrogen (H2) is the sought after ingredient with Co (carbon monoxide) the biproduct, a sluggish fuel with little power. On Co alone 60 km/hr speed was about our maximum average. When we later added steam we readily attained 80-90 km/hr, even within two minutes of lighting up.
There is not such a thing as dry wood in nature. It never gets below about 8% water with dew replenishment at night so we obtained a certain amount of steam from any wood used.
The equation used to produce hydrogen uses heat whereas the burning of hydrogen gives out heat. The more heat conserved means the more hydrogen. Hot carbon has a great affinity for oxygen. Air being 4/5 nitrogen dilutes the end product gas whereas the steam produces the hydrogen.
HYDROGEN THE GOAL.
To get optimum amount of hydrogen means to introduce the optimum amount of steam at a given temperature. This inevitably means at times a little more steam than necessary which condenses in the resulting gas as moisture and makes it almost impossible to operate a dry filtering system. My personal finding is that a wet filtering system is the answer. It is of paramount importance that a 100% clean gas be delivered to the engine.
From this you will see that we need to aim at the highest temperature possible to make the gas and the lowest temperature possible to deliver it to the engine. Every 30 degrees C the gas is cooled it occupies 10% less volume. The cooler the gas the richer it is with more energy per litre.
EXTRA HEAT MEANS EXTRA HYDROGEN.
To get the maximum heat we must eliminate all possible heat escape. The first way is to use a heat exchanger to superheat all incoming steam and air. Secondly we have means today to totally insulate the hopper. Relatively cheap insulation materials are available today which were not around in World War 2. In the war years nearly all units ran on charcoal and I believe there was very little experience with wood. (Good charcoal is pure carbon, totally free of tar, resin and ash). Materials were very scarce and improvising was done. At this stage we have yet to prove that enough extra performance is obtained to warrant the extra cost of using stainless steel to insulate the hopper.
CHOOSE PLENTY OF RESERVE ENGINE POWER
If you are choosing a vehicle aim for one with plenty of engine reserve power. Six cylinder is ideal although with a good gas many four cylinder cars should be OK (2 litre plus). Something ten years old or over is much easier to fit things under the bonnet.
In wartime the old cars had heavy chassis and often units were suspended from the back. Some had single swivel wheel trailers. I feel that for a car the best option is a 6'x4' box trailer as it also provides room for wood storage. We used to carry enough wood for 1000 km. A trailer can easily be unhooked to change to another vehicle, say a traytop truck or ute.
A TRAILER FAVOURED
It is very desirable to have the hopper and burner well behind the vehicle. Besides being a distance from the petrol tank you are less likely to get tar splash on the duco of your vehicle. It is difficult to avoid some tar splash when opening the lid to attend the fire. One must carefully watch if possible to park with the right wind direction. My next construction will involve a quick operating canvas blind to cover the rear of the vehicle. We spent many hours trying to rub off tar marks and found that the only real success came from using paint remover. A trailer drawn behind also lessens the number of ants and beetles entering the driver's cab from the wood.
VEHICLE MODIFICATION QUITE SIMPLE.
Modifications to the car are quite simple - quite the least of your problems. The gas has a long explosion and so the spark must be advanced a few degrees. A longer hold down stud for the distributor is used with a tight spring to enable a swivel to advance the spark. An arm is brased to a utilux clamp around the distributor. A thin rod is pivotted to the arm extending into the dash where a manual spark control is installed. It can be adjusted by feel of horsepower and then two settings established for gas and petrol.
A 50 mm exhaust tube must be brought from the back towbar underneath and up to the carby. A boxed in channel (about 2 cm thick) with a hole both sides to fit the carby flange is bolted under the carby to provide an extension about 20 cm out from the carby. The gas is brought into the end of this and an air inlet into the side. Both the gas and air are controlled by butterfly valves. The gas butterfly is connected to a second accelerator pedal and the air butterfly to a hand operated lever on the dash. Except for changing gears, the gas pedal is usually fully depressed and is also fixed so that the engine idles fairly fast (say over 1200 RPM). This enables sufficient engine vacuum to keep the gas flowing whilst pausing at traffic lights. The fuel mixture is regulated by the manual lever on the dash, using the feel of horsepower as a guide. It soon becomes 'second nature' to close or open the air when driving. We used a second air cleaner for this purpose. Guages showing engine RPM and vacuum are useful to the operator. I closed off the engine driven fuel pump and replaced it with an electric pump so that I could switch off the petrol on the dash as soon as the vehicle started on gas.
START ON GAS IF POSSIBLE.
It is good to be able to start on gas with no petrol to assist. This can be done by using a heater blower on high speed. The gas must be drawn right up to the neck of the carby and drawn through with the starter motor.
If one is to use gas alone certain modifications can be done such as the angle of the valves and compression ratio. The mixture can also be supercharged giving much more power. I believe, however, that all the necessary power is available through just engine vacuum and that the real challenge is to minimise expenditure, improvising wherever possible.
Using engine vacuum to draw the gas also is an assurance against leaks of the lethal carbon monoxide. Any leaks mean air being drawn in instead of Co leaking out. There were enough tragedies in World War 2 to treat this gas with much caution.
THE FIREBOX AND HOPPER
There is nothing more suitable for the outside cylinder than a heavy duty galvanised 44 gallon petrol drum. The heavy rim makes an ideal flange for pulling apart for maintenance on the firebox. It can easily be sealed with exhaust putty (see diagram). The capacity of the hopper can be raised a foot or so above the drum or the lid fitted to the top of the drum. For long country runs it is desirable to have a larger 'fuel tank'.
The lid is best about half the diameter of the drum. Using a metal to metal seal and a lid that 'dishes' slightly when pressed down it also acts as a safety valve in the event of a small explosion in the hopper. These should not occur but in the process of learning and experimenting it happened to us a couple of times.
The inner cylinder should be of at least 16 gauge mild steel and about 2"-3" less diameter than the drum. It rises above the height of the drum where it is attached with a flange. It is sealed at the top with the lid at the centre. About 1/3 down the petrol drum, the inner cylinder tapers down to a 6"-7" opening about 8" above the floor. The tapered or conical portion is best made of stainless steel of at least about 1/8" thickness. For ease of construction the stainless steel 'cone' can be octagonal, being crim ped in two sections in a press. The top of the 'octagonal cone' can be hammered into a true circle and welded to the base of the inner cylinder. The air and steam inlet is about a 1" hole half way down the side of the cone. We used mild steel MIG wire to weld the stainless steel cone and it has not shown any signs of cracking yet. There are obviously different expansion rates between mild and stainless steel and as the cone houses the 1000 degrees C area we are watching and observing.
MILD STEEL WILL OXIDISE AROUND AN INLET.
We tried a mild steel firebox and found thatwhere the air entered the hole through the red hot steel it cut open the hole with an oxy torch cutting affect. We overcame it with a stainless steel insert. This could be quite a satisfactory answer if the welding does eventually crack as mild steel is probably a quarter the price.
For the first part of the trip we had a ceramic fireclay lined fire box. From a temperature withstanding point of view this would have to be the best material. Most wood contains a percentage of silicon. In the north of Australia where white ants are more prevalent, sand attaches to the half ant eaten sticks increasing the silicon content more. This silicon forms slag which adheres to the ceramic like epoxy resin. When chipped off with a light crowbar it leaves a very rough surface. This caused one of our major problems, namely wood jam. Sometimes a pothole would cause a sufficient bump to break the cavity in the firebox and a fresh surge of gas would come. We found that a steel surface enables the wood to slide down more effectively, provided the air and steam enter through a stainless steel hole (see diagram). Even with a stainless steel firebox we sometimes had a cavity develop in the charcoal. Some of the highways in north W.A. have nothing resembling a bump in 100 km. We have in mind a mechanical agitator to solve the problem.
If it were not for cost I would recommend using stainless steel for the whole interior cylinder and cone. With oxidation of the mild steel and rust through moisture condensation when stopped one can only expect a four year life.
STEAM GOVERNS TEMPERATURE.
If the firebox cone is allowed to get too hot (1300-1400 C) it will distort. The automatic steam generator should govern the temperature to 1000 C. The hotter the gas, the more steam is generated which cools the hot carbon as it is reduced to hydrogen. The cone is similar to that which Nazi Germany used in World War 2.
Our hopper used to hold about two large wheelbarrow loads of wood cut to about 8-12 inch lengths. By the time the wood has dropped about half way down it becomes charcoal. When nearing our destination for the day we planned to be out of wood so as to enable an easier rake out next morning.
RAKING OUT.
When the rake out hatch is opened the mixture of charcoal (large and fine), slag and ash is raked across a screen leaving only the larger charcoal in the bucket. We used to recover about 2/3 of the mixture by volume. We then closed the hatch and returned the charcoal into the hopper. This would cover a few inches above the steam and air inlet hole. Opposite this opening is the lighting hole. With either the engine vacuum driving (on petrol) or a heater fan a lighted taper is placed in the lighting hole with the inward draft sucking the flame into the charcoal which ignites instantly. Within about one minute as you play the accelerator pedals and the gas/air mixture lever on the dash the vehicle should take off on gas. The petrol is switched off and you should reach 80 km/hr in another minute or so. It may however take twenty starts before you reach two minute takeoffs. There are many other factors which require maintenance and attention. Only experience will teach you accurate fault tracing.
Raking out when cold is best done with the vehicle parked so that the wind blows the dust away from you. A handle 4-5ft. long will help keep you clean in this dirtiest operation of all. In humid conditions the charcoal dust seems to embed in the pores of the skin and take about three scrubs to clean.
FILTRATION
The ash from wood contains fine silicon dust like carborundum grinding powder. If not filtered out 100% it will convert your sump oil to a grinding paste and bring quick disaster to the engine. We realised only 20,000 km out of a reconditioned Repco motor as we learned this important message.
WET FILTERING RECOMMENDED
As explained I very much favour wet filtering when chasing the optimum hydrogen power. I can not see how any dry filter method can cope with condensed moisture from excess steam. The wet method simply involves a flow of say 15 gallons per minute of water through a 'shower rose' with 3/8" holes and down through 1/2" diameter coke which is supported on a non-ferrous mesh. The flow of water down through the coke collects the dust from the gas as it proceeds up. At the same time it cools the gas. The sludge collects in a sump below the mesh (see diagram). A mechanically driven pump then recirculates the water through a cooling system and back to the 'shower rose'.
An old tractor radiator (with 1/2" holes) would be ideal for cooling. The drum used for the filter would best be nonferrous and thick enough to stand the engine vacuum. If mild steel is used sufficient thickness to allow for rust must be considered. The sump floor would best slope towards the outlet plug (1 1/2"). At each end of your journey just undo the plug and rake out the sludge as well and leave stand overnight and return most of the water. This is a very clean way of filtering as compared with the dry methods.
One possible disadvantage is that the gas becomes saturated with moisture. This can be overcome by passing the gas through a large inverted car radiator to cool the gas further and condense the moisture which returns to the filter. This radiator should ideally be located above the trailer to catch the breeze as well as being augmented with a 12v. fan. Eliminating moisture at this point also prevents water build up in low spots in the exhaust tubing to the carby.
MECHANICALLY DRIVEN PUMP FAVOURED
We tried a 12v. marine submersible bilge pump for circulating the filter. It only put out about half the flow the manufacturers stated and I am a little suspect of these motors when subject to runs of say 6-8 hours continuously. I favour something mechanical. I once saw a trailer with an old diff and a pump driven from the spline. Unfortunately this would not allow filtering whilst stationary. Look around for a suitable 12v. motor say 1/4-1/3 hp and a pump which would match the revs with direct coupling. Otherwise use a vee belt drive. If a gas producer was mounted on a ute or a traytop truck then a pump could be mechanically driven from the engine.
The lid of the filter must be flanged with a soft gasket as a seal. There must be a valve on the lid also for topping up the water level and another tap to check the sump level. It is possible that the recondensed steam will maintain the sump level without addition. The wet filter should trap 100% of the dust and even small amounts of tar vapour. If the gas is well cooled and dried to deliver to the engine I would recommend a secondary filter like a vacuum cleaner bag principle. Woollen blanket would be ideal material and sufficient to ensure a clean gas. A second filter tells you how well the first one is working. Preferably place it under the bonnet near the carby as the gas is coolest there if not place it on the trailer just before the flexible hose at the drawbar. With a quick clip on lid this filter can be quickly inspected and replaced. It would be simple to sew up half a dozen spare bags as they may block a little with dampness.
We have tried bubbling the gas through diesel but it seemed to be too much for the engine vacuum to handle and the diesel finished up being atomised and passed through to the engine. An oil bath filter like that used on the old tractors could be a useful secondary filter if the blanket method fails through dampness. A small amount of moisture in the gas can actually assist engine performance.
I do not want to be dogmatic in ruling out dry filtering but slightly too much steam or being caught with wet wood does present problems.
THE STEAM GENERATOR
As the hot gas (600 degrees C) leaves the top of the hopper through a 2" exhaust tube through the top of the hopper it passes down through a vertical jacket made out of the next largest size (see diagram). At the base of the jacket is 2-3" of water, the level being adjusted by raising or lowering an enclosed trough with a ball valve fed from a reserve at a higher level. The trough and jacket are connected by a length of 1/2" water hose. At the base of the jacket there is also an easy release flange (1 1/2" diam.) so as to clean out any solids from the jacket if brackish water is used. The hotter the gas, the more steam produced. By trial and error one can discover the optimum water level. As mentioned this acts as a temperature governor for the firebox (1000 degrees C). With outback travel a water storage of at least 20 gallons would be desirable. Heavy things are best carried at low levels. Some varieties of 12v. fuel pumps can handle water and pump it to the ball valve.
The steam jacket and the 2" line to the firebox inlet would best be insulated. Every degree of heat loss means less hydrogen.
For the small extra cost involved it would be advisable to use stainless steel exhaust tubing to avoid rust in the steam generator.
COOLING THE GAS AND DELIVERY
After the cooling of the gas through the steam generator it is desirable to cool it again as much as possible before entering the wet filter. This can effectively be done by making the walls around the firewood storage (on the trailer behind the hopper) say 18" high by 1 1/2 wide. Air fins could be welded into the sides to further assist in heat loss. Also the reduced velocity of the gas would settle a deal of dust which could be blown out periodically with an air hose. The whole structure also has the advantage of drying out wet wood.
The gas system being drawn through engine vacuum must be well sealed at all joints. Any leaks draw air in making a potential explosion mixture. The position of the air mixture lever on the dash will indicate a major air leak.
LOG ON EVENTS OF TRIP.
1.Left Canberra 14/2/87 Travelled via Dubbo, Tamworth, Inverell, Goondiwindi. Set out with ceramic lined firebax.
2.0ver 300 km in a day from Goondiwindi to Roma,Qld. Completed over 1000 km on single stockup of ironbark from Wee Waa (NSW).
3.Removed head at Bowen (May). Valves excellent, head clean but some gumming of oil rings. Experimented with air scoop - no improvement. Tried bubbling gas through water which evaporated very quickly.
4.Dry wood very scarce near Innisfail. Used sugar cane spill.
5.Hughenden (June). A chronic problem of rsood jam due to slag build up on ceramic firebox from grit due to white ants. Had to stop every 10 km and break jams with light crowbar. Decided to break up ceramic lining and try with 1/8" guage' stainless steel cane only.
6.Performance now excellent - little wood jam.
7.Broke conrod at Camooweal,Qld (July). Replaced 200 Ford motor with 250 (4.1 Litre).Excellent speeds, some stretches averaged 70 km/hr.
8.Completed 1000 km in two days (Camooweal to Alice Springs).
9.Installed saw bench on front bumper bar at Alice Springs.
10.Tried bubbling gas through sump oil and over sump oil but no improvement.
11.Firebox failure at Darwin (Sept). Weld on stainless steel had cracked open. Remade firebox with 3/16" mild steel. Also added cooling system on trailer, installed torque converter fan.
12.Removed head at Katherine. Valves still good.
13.Firebox trouble - rebuilt at Halls Creek (Oct.).Hexagonal in 3/8" mild steel. Air passing through red hot mild steel cut like an oxy torch burn- ing out steel cone.
14.Continued down W.A. coast with moderate performance but burning out problem was not solved.
15.Flanged wood hopper at South Hedland (Nov). Repaired firebox. Flanging meant firebox can be out in 20 minutes for repairs.
16.Repaired firebox at Geraldton ,WA.
17.Perth. (Dec). New design of firebox.
18.Repairs at Albany.
19.Repaired firebox at Kalgoorlie.
20.Adelaide early Feb.88. New firebox did give as good a burn as the original one.often had to clean plugs (possibly needed tune up),
21.Rebuilt to original design a firebox at Mildura,Vic.,with stainless steel inserts to overcome oxy torch cutting effect in mild steel. Satisfied this is the best design.
22.Mildura - Canberra (900 km) in two days with little wood jam problem or plugs carbonning up, which was excellent as the vehicle was bad'ly in need of an electrical tune up. Arrived Canberra 13/2/88.FAULT TRACING
LACK OF ENGINE POWER
1.Low in wood - pull'up and refill.
2.Air mixture lever needs adjusting.
3.Cavity due to wood jam - drive over bump on roadside or else raise the lid and break with a light crowbar.
4.Cavity in charcoal same as for no.3.
5.Blocked filter put in a cleaner secondary filter bag (under bonnet?). The wet filter system cannot block if cleaned daily.
6.Air leaks pressurise hopper with 12v. blower and smoke will reveal leaks. Fix with sealant e.g. exhaust putty at very hot areas or else selastic. Check that lid is properly sealed.
7.Condensed water vapour in 50mm tubing going to carby. Check low spots. Undo joints and empty. It is good to have plenty of radiator hose joints with clamps for easy cleaning of tubes.
8.Excess steam cooling fire box too much - adjust water level in steam generator.
9.Lack of steam and thus lack of hydrogen - adjust steam generator and check water level in storage tank.
10.Hole in firebox by elimination when all above have been checked loot for more drastic problems such as this. When fire box is cold reach in the rake out hatch and feel for any burn holes in the steel. Look down from the top lid as well.
11.Wet wood. Empty hopper and replace with dry wood. Pack wet wood in trailer behind fire box to dry out.
12.Clean spark plugs. Check coil and distributor points.
13.Clean air cleaner.EXTRA POINTS TO CONSIDER
Inexpensive guages could be added to your dash such an old fuel guages to indicate water levels on water filter and storage tank.
A vacuum guage before and after the second filter could also be helpful. If a temperature guage from a pottery furnace could be fitted to show the firebox temperature (on the gas outlet) it would be a helpful early warning device.
IGNITIONAny improvement in ignition is worth the trouble. The electronic systems of the 80's give more reliable spark and do not require the maintenance for peak efficiency.
INLET AND EXHAUST MANIFOLDS
Anything that improves efficiency such as extractors for petrol motors would also improve it for producer gas.
OIL FILTERING
Although we emphasised the need for 100% effective gas filtering it is a good safeguard to have the added insurance in oil filtering. The 'toilet roll' bipass filters such as the 'Franz' could be worth the expense.
UPPER CYLINDER LUBRICATION
Kits are now available for lubricating the upper cylinder. I understand that they retail for about $40 and have proved satisfactory in overcoming head wear in engines run on LP gas. These kits should overcome for producer gas also which is dry like LPG.
Wood Gas Producers
Not a new idea. The first recorded producer was that of Bischof (1839), and 1st gas producer driven vehicle was built by J.W. Parker 1901. The early model producers were very cumbersome & heavy and even today producers are still manufactured along the same lines as the early German designs.
We have developed a much lighter unit and less labour intense. The units are made of 1- 1.6mm galvanized iron. These units can be fitted to your generator set, tractor, motor vehicle, or simply for heating purposes such as water heating, grain drying etc.